Monday, September 8, 2014
Eclipse (or any other derive IDE) unable to start.
No comments
:
Labels:
Eclipse
,
Java
,
sts
,
Ubuntu

$ java -version
in my terminal it gives me the current JDK installed in my computer. Even JDK is there I can't use my Eclipse or any derive IDE from it.
A way of getting around this problem is to give argument to the Eclipse at the start. That is by editing the eclipse.ini (STS.in my case) and the following line,
-vm
/path/to/jdk/bin
Ex :
-vm
/home/randika/Programming/jdk1.8.0_11/bin
before the line,
-vmargs
Thats it. Now Eclipse works and back to coding.... WE CODE HARD !!

Saturday, August 23, 2014
Install NodeJs,npm,bower,yoeman,grunt without sudo

Node.js® is a platform built on Chrome's JavaScript runtime for easily building fast, scalable network applications. Node.js uses an event-driven, non-blocking I/O model that makes it lightweight and efficient, perfect for data-intensive real-time applications that run across distributed devices. - http://nodejs.org/
Nodejs comes with a package manger call npm (Node package manger). This command line tool is used to install other tools like bower,yoeman,grunt-cli etc. Nodejs can be easily installed using the Ubuntu package manger apt-get. One of my friend has a short but good post of it (Install bower.).
In my post I will show how to install nodejs and some other tools like bower install in your Ubuntu without 'sudo'.
1. Get the latest nodejs from this site.Make sure you get the Linux version here and select the proper arch type,32bit or 64bit.
2.Extract the content to a directory that you have access.Ex. In my case I use
~/Programming/node-v0.10.31-linux-x64
The node directory name may change according to the version and archtype you are getting.By the time I write this its version 0.10.31.
here the directory name is important as we want it later to install other tools.
3.Now we need to add the node and nmp to the system environment.Edit .bashrc (which is hidden by default in ~/.bashrc). Add the following line to the code.
#NodeJs
export PATH=
In my case this is.
#NodeJs
export PATH=/home/randika/Programming/node-v0.10.31-linux-x64/bin:$PATH
4. Save the file. Launch a terminal and type
npm -v
you should get the version number of the node that you have installed.
5. To install other tools using npm we can use,
nmp install [package name]
For example if I want to install bower using npm,
npm install bower -g --prefix ~/Programming/node-v0.10.31-linux-x64/
6. Check for installed version of bower using
bower -v
7. Likewise you can install Yeoman and Grunt using nmp.
npm install yo -g --prefix ~/Programming/node-v0.10.31-linux-x64/
npm install grunt-cli -g --prefix ~/Programming/node-v0.10.31-linux-x64/
Update:
You can set the prefix path in npm by
npm config set prefix
in my case its
npm config set prefix ~/Programming/node-v0.10.31-linux-x64/
Wednesday, August 20, 2014
Spring Boot
No comments
:
Labels:
Spring

Now that heavy configurations are simplified with Spring Boot Project. You can go to Spring Boot website and get more information about it. But I will work on a full application develop with this project and cover more interesting parts in a series of posts later. Till that you can follow the sample guides that in the website. I highly recommend to download and install Spring Suite Tools witch is very easy to develop Spring applications.
Update:
Check my Youtube chanel for the video guide lines.
Thursday, January 6, 2011
NTFS Configaration Tool
No comments
:
Labels:
Ubuntu
 |
| Ntfs-config |
Then go to System>Administration> NTFS Configure Tool.
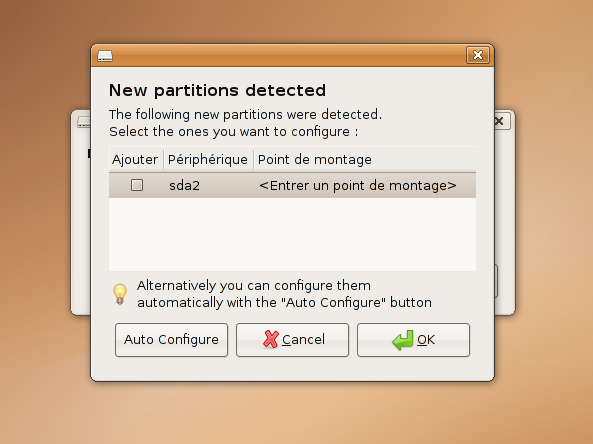
I select my NTFS drives manually and click OK.
But If you want your all NTFS drives to mount select Auto Configure.

Tick the two options give to read and write.Then close after you done.
Now when you start your computer your drives will be automatically mounted.
Why we need this to happen?
01.The main advantage is that we don't have to mount your drivers every time you log in to the system.This may seem easy but think if you have 10 NTFS drives??
02.If you have selected a wall paper from a unmounted drive it will not show.(Most of the time).Do you want to look empty desktop when you log in ?(Me No way).
Same will happen to audio files you play.They will not play from a play list till you mount them.
Now for a problem I have faced my self is that when we change the name of the Drive,there will be a problem when we start the OS.That they say to mount the drives as they are no longer in the same name they are now.
The solution is the remove the entry.To do so we must log in to the system.(Manually mount the drive for now at the start).Then go to the terminal and type
sudo gedit /etc/fstabEnter your password and this will open a Text file that with all the entries.
It will have lines like
#Entry for /dev/sda1 :and anther line below it.This may change from the numbers of drives you have mounted.Find your old drive name in such line followed by /media/
Then comment that entire line by adding a # in-front of the line.Save and close.Next time you restart that message will no longer show to you.If you want to mount it on start, use the NTFS Configuration Tools Again as above.
Wednesday, July 21, 2010
How to install LAMP and configure phpMyadmin
No comments
:
Labels:
Ubuntu

1)Go to terminal and type
$ sudo apt-get install lamp-server^Enter the password for the user.
It will ask a password for mysql.Give a password you desire.
2)Then install phpyyadmin;
$ sudo apt-get install phpmyadminIt will asked for automatic configure in the install but most of the time this is not working perfectly.So to do this manually,follow this
$ gksudo gedit /etc/apache2/apache2.confEnter the password for the user.
Add the following line to the text file that will come.
Include /etc/phpmyadmin/apache.conf
3)Restart apache by ;
$ sudo /etc/init.d/apache2 restartor (works for Ubuntu 10.04)
$ sudo service apache2 restart You can access phpmyadmin via a web browser;
http://localhost/phpmyadmin
Subscribe to:
Posts
(
Atom
)


